Ultrasonic Testing
Ultrasonic testing (UT) is the name given to the NDT application of sound waves having frequencies higher than those that the human ear can hear. This energy is induced into a material without destroying them, and in many applications, can be performed while in service. Ultrasonic testing can be used to measure the thickness of a material for verification, corrosion mapping or to examine the internal structure of a material for possible discontinuities, such as voids or cracks.
There are three basic modes of UT that Cave Inspection is capable of offering to our clients. Longitudinal, Shear (or angle beam) and Phased array.
Conventional UT
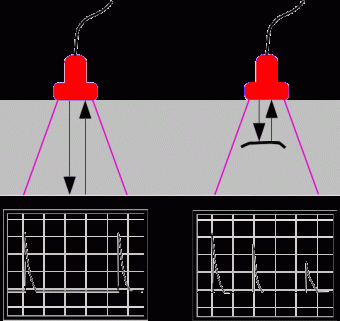
Longitudinal waves, compressional waves or 0 degree waves are used primarily to check a material for thickness, laminations or voids perpendicular to the energy sound travel. When using a dual element transducer, thicknesses up to 1mm can be determined with great accuracy. For PAUT, the use of specialized transducers is required to obtain such results. Standard contoured wedges can easily resolve signals on material thickness up to 3mm and greater.
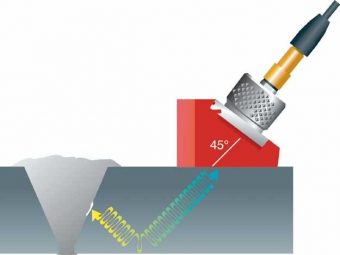
Shear waves or angle beams are used primarily for volumetric weld inspection using shear angles of 45, 60, or 70 degrees. Angle beam weld inspection is one of the only NDT methods that can be used in lieu of Radiography to detect volumetric type indications trapped within a weld such as fusion type indications, cracks, slag, and to a lesser extent porosity.


UT Limitations
As with any NDT method, there are limitations that arise. Many can be corrected and other cannot:
- Cleanliness of material to be examined is of the utmost importance. Any material requiring UT inspection, either conventional or PAUT, must be free and clear of any rust, scale, debris, surface corrosion, coating or thick paint.
- Discontinuities running parallel to the incident angle may go unnoticed and are usually undetectable with UT
- UT is not the best method to detect porosity
- Geometry of the part and accessibility, are deciding factors on the extent of capable UT
- Technician training is more advanced that other NDT methods
- Evaluation of weld type indications are subject to technician interpretation and may not be as accurate as RT inspection. UT inspection is based off a sound reflection and not a physical image as seen on a radiograph. Therefore, the use of the term “reflector” is often used by the UT technician when reporting a weld discontinuity notice during the examination.
- For PAUT and conventional UT weld inspection, material thickness less then 6mm will result in inconclusive results as the pulse responses shown on the instrument are very difficult to resolve with any form of accuracy.
- High temperature piping greater than 93C require specialized transducers and couplant for any longitudinal inspection.
- Higher temperature weld inspection cannot be performed with the current capabilities of Cave Inspection